How to Make Great Slump-Molded Plates with A Cheap Craft Store Tool
Taken from an excerpt of an article appearing in the February 2015 issue of Ceramics Monthly by Nancy Gallagher, dated January 26, 2015, Ceramic Arts Daily
Do you want to make quick work of multiple, hand-built plate forms? Try using Styrofoam rings that are found in most craft supply stores (for wreath making). They’re inexpensive, lightweight, and easy to store.
Try to make some slab-molded plates using a 12-inch-foam wreath form. With this method, Ceramicist Nancy Gallagher is able to make multiple plates at the same time with consistent results. The wreath forms are available in many sizes and hold up well to wet clay, allowing for repeated use.
Forming the Plate
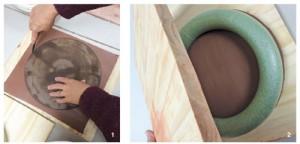
Starting out with a slab and a sturdy ware board, use a 12-inch bat to trace and cut out the initial circular shape (1). If the slab is textured, make sure to have the textured side down.
Once the circle is cut out, center the wreath form on top of the slab, place another board on top of the wreath form, then flip the entire sandwich over (2).
For consistent shape and size, center the wreath form and slab on a banding wheel. With a wire knife or cheese cutter braced still, perpendicular to the slab, and using the edge of the wreath form as a stop guide, spin the banding wheel and cut even trim all around the plate (3).
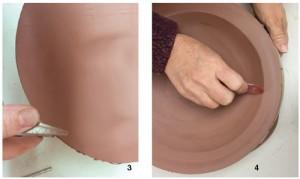
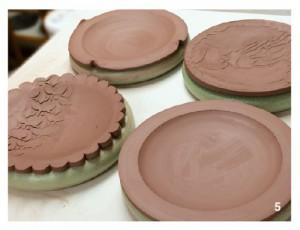
If a shallow, rim-less plate is desired, tap the slab and mold down gently against the board, allowing the plate to slump naturally. For a rimmed plate, again utilize the spinning banding wheel, while bracing a soft rubber rib against the inside rim of the mold (4). This gives definition and a transition to where the rim begins. Any alteration of the rims and rounding of edges can be done with the plates on the mold (5).
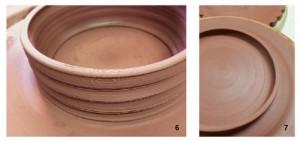
Throwing Foot Rings
While the plates are setting up, throw the foot rings on the wheel, cutting them all from one open cylinder (6). This allows for consistent measurement and accurate stacking.
Once the foot rings and the plates are equally leather hard, place a plate upside down on a foam-topped banding wheel. Center the foot ring on the plate, mark its placement, remove it, then score and slip both the plate and foot ring (7). Press the foot ring firmly into place, smoothing the top and inside edges with a soft rubber rib. Allow the plates to dry slowly under plastic.
This article previously appeared in an issue of the Potters and Sculptors Club Newsletter with portions excerpted from the February 2015 issue of Ceramics Monthly.